


Cara Membuat Aplikasi Android dengan Mudah – pesonainformatika.com semua orang pasti punya smartphone, dan pasti membutuhkan aplikasi untuk keperluan tertentu
tapi pernah gak sih kamu terpikir untuk membuat aplikasi android..? yap pada pembahasan kali ini kita akan membuat aplikasi android bagaimana caranya..?
dalam studi kasus kali ini kita akan membuat aplikasi android kalkulator menggunakan android studio bagian bagian yang akan kita buat seperti dibawah ini
- Membuat Layout atau Tampilan Kalkulator
- Membuat Logika Kalkulator menggunakan Bahasa Pemrograman Java
sekarang kita masuk ke langkah pertama yaitu membuat project dengan android studio, saya asumsikan sudah menginstall android studio di komputer masing-masing
Membuat Project Menggunakan Android Studio
kita akan menggunakan canvas empty Canvas, karena itu klik New Project lalu pilih Empty

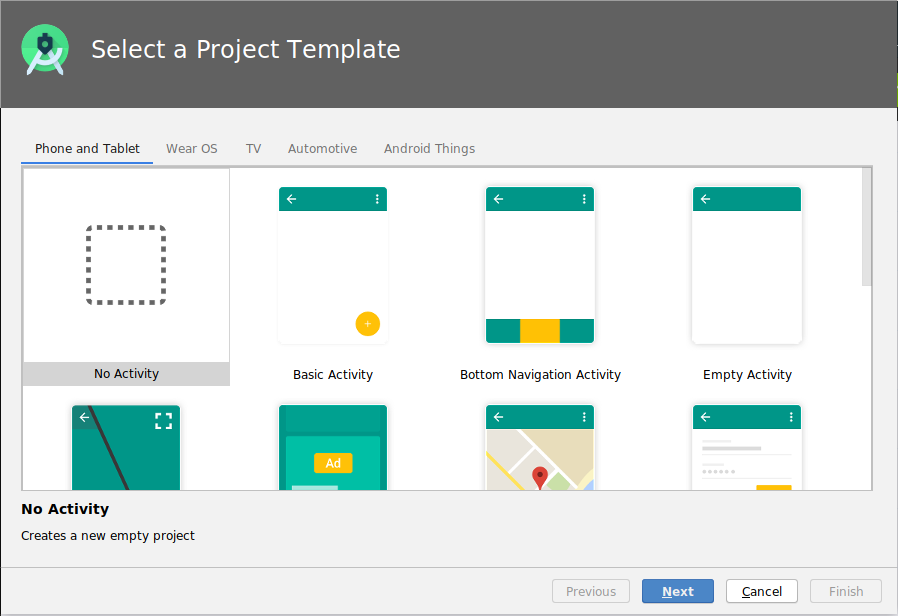
setelah memilih klik next
lalu langkah selanjutnya konfigurasi aplikasi yang akan kita buat seperti ini jangan lupa pastikan Language Pilih Java

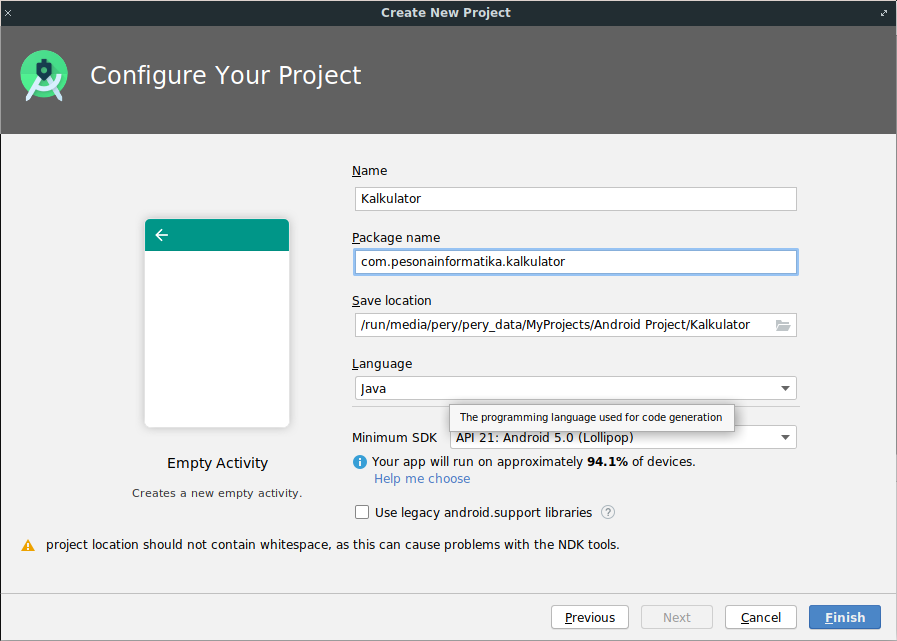
setelah itu klik Finish, dan holla project sudah terbuat kita bisa masuk ke langkah selanjutnya
Membuat Desain Layout
langkah selanjutnya kita bisa mendesain tampilan dari aplikasi kita, isi file ‘activity_main.xml‘ seperti ini dalam kasus ini kita akan menggunakan beberapa widget yaitu
- Text View
- Button
Text View digunakan untuk menampilkan angka ke layar pada aplikasi kalkulator kita dan button digunakan untuk menggantikan keypad default android hal ini diperlukan untuk mencegah input manual dari pengguna, ada juga beberapa layout yang akan digunakan seperti
- Relative Layout
- Linear Layout
berikut kode lengkapnya
<RelativeLayout xmlns:android="http://schemas.android.com/apk/res/android"
    xmlns:tools="http://schemas.android.com/tools"
    android:layout_width="match_parent"
    android:layout_height="match_parent"

    tools:context=".MainActivity">

    <TextView
        android:id="@+id/txtScreen"
        android:layout_width="match_parent"
        android:layout_height="wrap_content"
        android:layout_alignParentTop="true"
        android:layout_centerHorizontal="true"
        android:gravity="right|center_vertical"
        android:maxLength="16"
        android:padding="10dp"
        android:textAppearance="?android:attr/textAppearanceLarge"
        android:textSize="30sp"
        android:typeface="serif" />

    <LinearLayout
        android:layout_width="match_parent"
        android:layout_height="match_parent"
        android:layout_below="@+id/txtScreen"
        android:orientation="vertical">

        <LinearLayout
            android:layout_width="match_parent"
            android:layout_height="0dp"
            android:layout_weight="1">

            <Button
                android:id="@+id/btnSeven"
                android:layout_width="0dp"
                android:layout_height="match_parent"
                android:layout_weight="1"
                android:background="@drawable/button"
                android:text="7"
                android:textSize="30sp" />

            <Button
                android:id="@+id/btnEight"
                android:layout_width="0dp"
                android:layout_height="match_parent"
                android:layout_weight="1"
                android:background="@drawable/button"
                android:text="8"
                android:textSize="30sp" />

            <Button
                android:id="@+id/btnNine"
                android:layout_width="0dp"
                android:layout_height="match_parent"
                android:layout_weight="1"
                android:background="@drawable/button"
                android:text="9"
                android:textSize="30sp" />

            <Button
                android:id="@+id/btnDivide"
                android:layout_width="0dp"
                android:layout_height="match_parent"
                android:layout_weight="1"
                android:background="@drawable/button"
                android:text="/"
                android:textSize="30sp" />
        </LinearLayout>

        <LinearLayout
            android:layout_width="match_parent"
            android:layout_height="0dp"
            android:layout_weight="1">

            <Button
                android:id="@+id/btnFour"
                android:layout_width="0dp"
                android:layout_height="match_parent"
                android:layout_weight="1"
                android:background="@drawable/button"
                android:text="4"
                android:textSize="30sp" />

            <Button
                android:id="@+id/btnFive"
                android:layout_width="0dp"
                android:layout_height="match_parent"
                android:layout_weight="1"
                android:background="@drawable/button"
                android:text="5"
                android:textSize="30sp" />

            <Button
                android:id="@+id/btnSix"
                android:layout_width="0dp"
                android:layout_height="match_parent"
                android:layout_weight="1"
                android:background="@drawable/button"
                android:text="6"
                android:textSize="30sp" />

            <Button
                android:id="@+id/btnMultiply"
                android:layout_width="0dp"
                android:layout_height="match_parent"
                android:layout_weight="1"
                android:background="@drawable/button"
                android:text="*"
                android:textSize="30sp" />
        </LinearLayout>

        <LinearLayout
            android:layout_width="match_parent"
            android:layout_height="0dp"
            android:layout_weight="1">

            <Button
                android:id="@+id/btnOne"
                android:layout_width="0dp"
                android:layout_height="match_parent"
                android:layout_weight="1"
                android:background="@drawable/button"
                android:text="1"
                android:textSize="30sp" />

            <Button
                android:id="@+id/btnTwo"
                android:layout_width="0dp"
                android:layout_height="match_parent"
                android:layout_weight="1"
                android:background="@drawable/button"
                android:text="2"
                android:textSize="30sp" />

            <Button
                android:id="@+id/btnThree"
                android:layout_width="0dp"
                android:layout_height="match_parent"
                android:layout_weight="1"
                android:background="@drawable/button"
                android:text="3"
                android:textSize="30sp" />

            <Button
                android:id="@+id/btnSubtract"
                android:layout_width="0dp"
                android:layout_height="match_parent"
                android:layout_weight="1"
                android:background="@drawable/button"
                android:text="-"
                android:textSize="30sp" />
        </LinearLayout>

        <LinearLayout
            android:layout_width="match_parent"
            android:layout_height="0dp"
            android:layout_weight="1">

            <Button
                android:id="@+id/btnDot"
                android:layout_width="0dp"
                android:layout_height="match_parent"
                android:layout_weight="1"
                android:background="@drawable/button"
                android:text="."
                android:textSize="30sp" />

            <Button
                android:id="@+id/btnZero"
                android:layout_width="0dp"
                android:layout_height="match_parent"
                android:layout_weight="1"
                android:background="@drawable/button"
                android:text="0"
                android:textSize="30sp" />

            <Button
                android:id="@+id/btnClear"
                android:layout_width="0dp"
                android:layout_height="match_parent"
                android:layout_weight="1"
                android:background="@drawable/button"
                android:text="C"
                android:textSize="30sp" />

            <Button
                android:id="@+id/btnAdd"
                android:layout_width="0dp"
                android:layout_height="match_parent"
                android:layout_weight="1"
                android:background="@drawable/button"
                android:text="+"
                android:textSize="30sp" />
        </LinearLayout>

        <LinearLayout
            android:layout_width="match_parent"
            android:layout_height="0dp"
            android:layout_weight="1">

            <Button
                android:id="@+id/btnEqual"
                android:layout_width="0dp"
                android:layout_height="match_parent"
                android:layout_weight="1"
                android:background="@drawable/button"
                android:text="="
                android:textSize="30sp" />

        </LinearLayout>

    </LinearLayout>

</RelativeLayout>


Modifikasi Tampilan Button
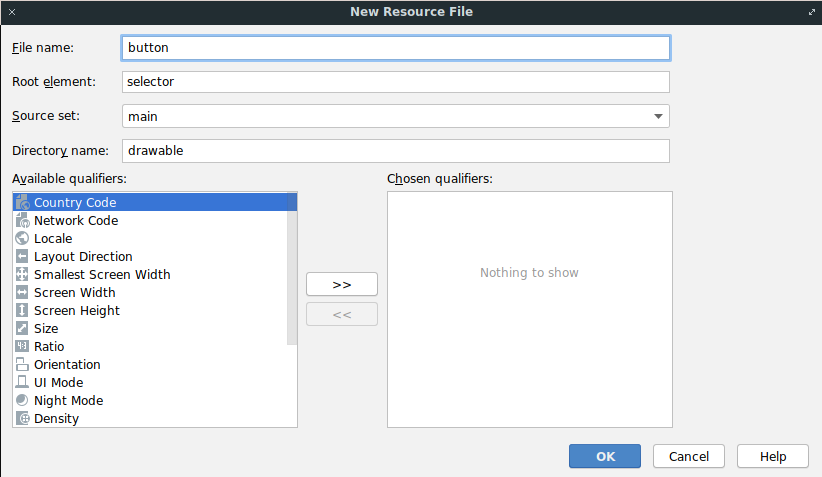
sebenarnya sudah diterapkan namun belum dilihatkan kodenya hehe, kita bisa memodifikasi tampilan backround pada tombol yang tadi kita buat dengan menambahkan file .xml di folder drawable dengan cara add drawable resource file

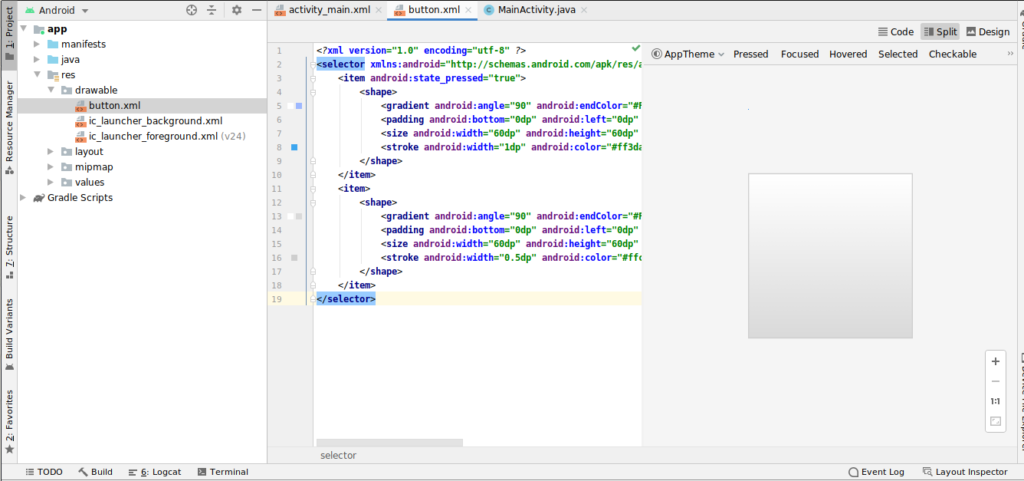

berikut adalah isi dari button.xml
<?xml version="1.0" encoding="utf-8" ?>
<selector xmlns:android="http://schemas.android.com/apk/res/android">
    <item android:state_pressed="true">
        <shape>
            <gradient android:angle="90" android:endColor="#FFFFFF" android:startColor="#9EB8FF" android:type="linear" />
            <padding android:bottom="0dp" android:left="0dp" android:right="0dp" android:top="0dp" />
            <size android:width="60dp" android:height="60dp" />
            <stroke android:width="1dp" android:color="#ff3da6ef" />
        </shape>
    </item>
    <item>
        <shape>
            <gradient android:angle="90" android:endColor="#FFFFFF" android:startColor="#ffd9d9d9" android:type="linear" />
            <padding android:bottom="0dp" android:left="0dp" android:right="0dp" android:top="0dp" />
            <size android:width="60dp" android:height="60dp" />
            <stroke android:width="0.5dp" android:color="#ffcecece" />
        </shape>
    </item>
</selector>
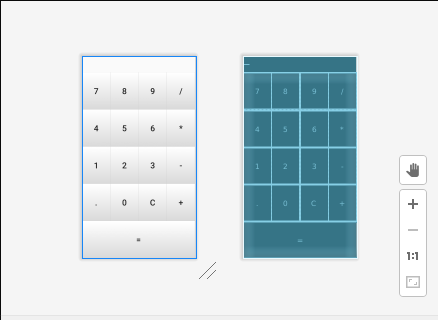
hasilnya sepert ini

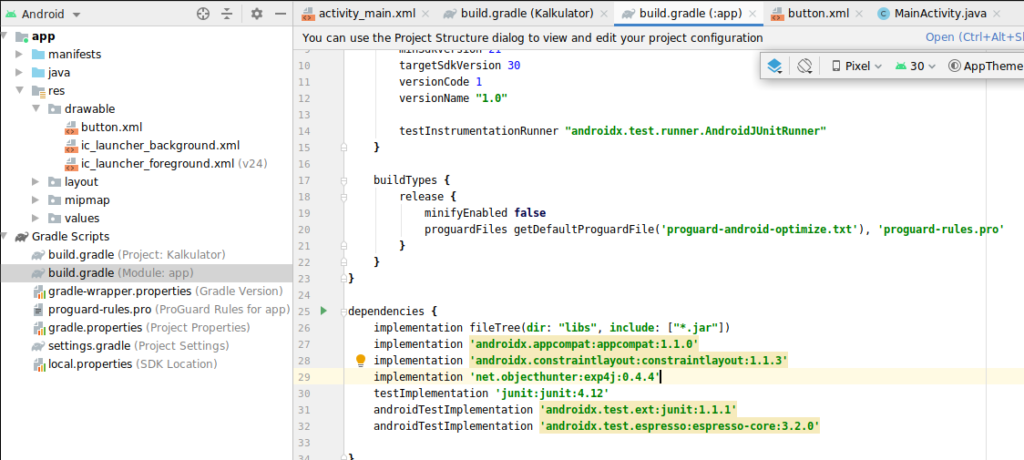
Instalasi Library
kita menggunakan library compile ‘net.objecthunter:exp4j:0.4.4’ untuk evaluasi operasi aritmatika kita tambahkan pada dependensi gradle
apply plugin: 'com.android.application'

android {
    compileSdkVersion 30
    buildToolsVersion "30.0.2"

    defaultConfig {
        applicationId "com.pesonainformatika.kalkulator"
        minSdkVersion 21
        targetSdkVersion 30
        versionCode 1
        versionName "1.0"

        testInstrumentationRunner "androidx.test.runner.AndroidJUnitRunner"
    }

    buildTypes {
        release {
            minifyEnabled false
            proguardFiles getDefaultProguardFile('proguard-android-optimize.txt'), 'proguard-rules.pro'
        }
    }
}

dependencies {
    implementation fileTree(dir: "libs", include: ["*.jar"])
    implementation 'androidx.appcompat:appcompat:1.1.0'
    implementation 'androidx.constraintlayout:constraintlayout:1.1.3'
    implementation 'net.objecthunter:exp4j:0.4.4'
    testImplementation 'junit:junit:4.12'
    androidTestImplementation 'androidx.test.ext:junit:1.1.1'
    androidTestImplementation 'androidx.test.espresso:espresso-core:3.2.0'

}

setelah selesai kita bisa membuat logika dengan menggunakan bahasa pemrograman Java
Membuat Logika Program Menggunakan Java
kita bisa mengedit membuat logika aplikasi kita edit file MainActivity.java seperti ini
package com.pesonainformatika.kalkulator;

import androidx.appcompat.app.AppCompatActivity;

import android.os.Bundle;
import android.view.View;
import android.widget.Button;
import android.widget.TextView;

import net.objecthunter.exp4j.Expression;
import net.objecthunter.exp4j.ExpressionBuilder;


public class MainActivity extends AppCompatActivity {
    // IDs of all the numeric buttons
    private int[] numericButtons = {R.id.btnZero, R.id.btnOne, R.id.btnTwo, R.id.btnThree, R.id.btnFour, R.id.btnFive, R.id.btnSix, R.id.btnSeven, R.id.btnEight, R.id.btnNine};
    // IDs of all the operator buttons
    private int[] operatorButtons = {R.id.btnAdd, R.id.btnSubtract, R.id.btnMultiply, R.id.btnDivide};
    // TextView used to display the output
    private TextView txtScreen;
    // Represent whether the lastly pressed key is numeric or not
    private boolean lastNumeric;
    // Represent that current state is in error or not
    private boolean stateError;
    // If true, do not allow to add another DOT
    private boolean lastDot;

    @Override
    protected void onCreate(Bundle savedInstanceState) {
        super.onCreate(savedInstanceState);
        setContentView(R.layout.activity_main);
        // Find the TextView
        this.txtScreen = (TextView) findViewById(R.id.txtScreen);
        // Find and set OnClickListener to numeric buttons
        setNumericOnClickListener();
        // Find and set OnClickListener to operator buttons, equal button and decimal point button
        setOperatorOnClickListener();
    }

    /**
     * Find and set OnClickListener to numeric buttons.
     */
    private void setNumericOnClickListener() {
        // Create a common OnClickListener
        View.OnClickListener listener = new View.OnClickListener() {
            @Override
            public void onClick(View v) {
                // Just append/set the text of clicked button
                Button button = (Button) v;
                if (stateError) {
                    // If current state is Error, replace the error message
                    txtScreen.setText(button.getText());
                    stateError = false;
                } else {
                    // If not, already there is a valid expression so append to it
                    txtScreen.append(button.getText());
                }
                // Set the flag
                lastNumeric = true;
            }
        };
        // Assign the listener to all the numeric buttons
        for (int id : numericButtons) {
            findViewById(id).setOnClickListener(listener);
        }
    }

    /**
     * Find and set OnClickListener to operator buttons, equal button and decimal point button.
     */
    private void setOperatorOnClickListener() {
        // Create a common OnClickListener for operators
        View.OnClickListener listener = new View.OnClickListener() {
            @Override
            public void onClick(View v) {
                // If the current state is Error do not append the operator
                // If the last input is number only, append the operator
                if (lastNumeric && !stateError) {
                    Button button = (Button) v;
                    txtScreen.append(button.getText());
                    lastNumeric = false;
                    lastDot = false;    // Reset the DOT flag
                }
            }
        };
        // Assign the listener to all the operator buttons
        for (int id : operatorButtons) {
            findViewById(id).setOnClickListener(listener);
        }
        // Decimal point
        findViewById(R.id.btnDot).setOnClickListener(new View.OnClickListener() {
            @Override
            public void onClick(View v) {
                if (lastNumeric && !stateError && !lastDot) {
                    txtScreen.append(".");
                    lastNumeric = false;
                    lastDot = true;
                }
            }
        });
        // Clear button
        findViewById(R.id.btnClear).setOnClickListener(new View.OnClickListener() {
            @Override
            public void onClick(View v) {
                txtScreen.setText("");  // Clear the screen
                // Reset all the states and flags
                lastNumeric = false;
                stateError = false;
                lastDot = false;
            }
        });
        // Equal button
        findViewById(R.id.btnEqual).setOnClickListener(new View.OnClickListener() {
            @Override
            public void onClick(View v) {
                onEqual();
            }
        });
    }

    /**
     * Logic to calculate the solution.
     */
    private void onEqual() {
        // If the current state is error, nothing to do.
        // If the last input is a number only, solution can be found.
        if (lastNumeric && !stateError) {
            // Read the expression
            String txt = txtScreen.getText().toString();
            // Create an Expression (A class from exp4j library)
            Expression expression = new ExpressionBuilder(txt).build();
            try {
                // Calculate the result and display
                double result = expression.evaluate();
                txtScreen.setText(Double.toString(result));
                lastDot = true; // Result contains a dot
            } catch (ArithmeticException ex) {
                // Display an error message
                txtScreen.setText("Error");
                stateError = true;
                lastNumeric = false;
            }
        }
    }
}
Menjalankan Aplikasi
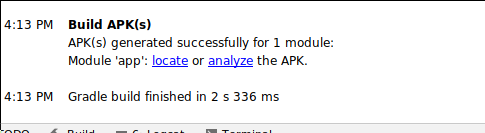
kita bisa menjalankan aplikasi dengan menggunakan smartphone kesayangan kita langkah pertama kita bisa build dengan cara
bulid > build apk
pada menu bulid kita bisa klik locale untuk mengetahui lokasi dimana aplikasi hasil build kita tadi

setelah itu bisa di copy lalu di install di perangkat smartphone kesayangan kita


setelah instalasi selesai kita bisa lihat hasilnya seperti ini

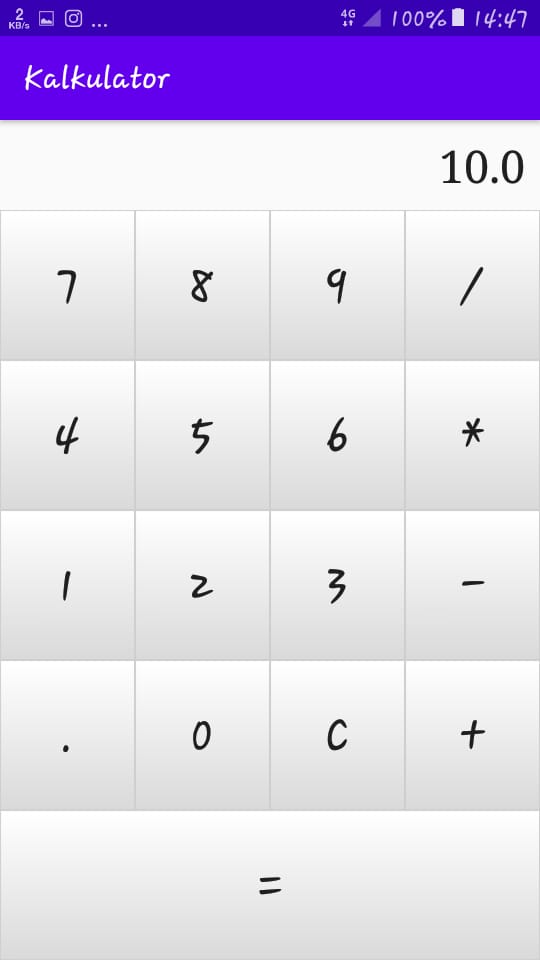
yap aplikasi yang kita buat sudah selesai kita bisa jalankan aplikasi kita, semoga bermanfaat dan selamat mencoba


people who use linux and people who are friendly